# 快速上手
# 创建插件
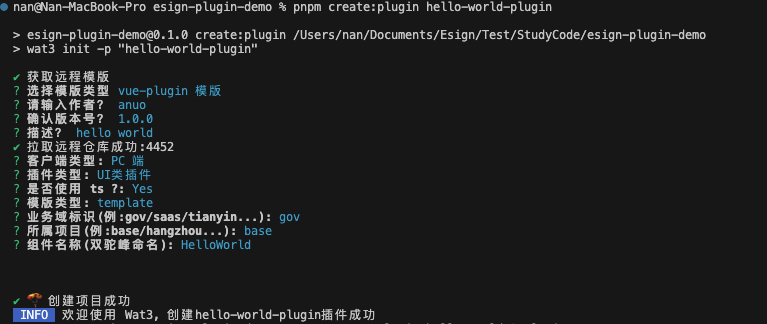
快捷模板
- ❗️ ❗️ ❗️ 必须安装 wat3
- ❗️ 插件模版已接入国际化文件,请先安装
vue-i18n# vue@2.6.14 请安装 vue-i18n@^8.26.2 版本 pnpm add vue-i18n@^8.26.2 -w # cross-env 参数解析 pnpm add cross-env -wD - 根目录下 执行指令:
# hello-world-plugin` 为插件名称
pnpm create:plugin hello-world-plugin
创建单个JS插件
- 文件命名 参照项目命名规则,以
-plugin结尾,例:hello-world-plugin - 插件目录命名 /plugins/项目(或基线)标识/插件名[或多插件集合(单插件对应多扩展点)目录],例:
/plugins/base/hello-world-plugin/src/index
- 文件命名 参照项目命名规则,以
# 插件结构
插件基本目录结构
插件内容在插件 src 目录下
hello-world-plugin
│  package.json         // 插件的 package.json
│  tsconfig.json        // 插件的 ts
|  README.md            // 插件 MD 文档
│
└─src
    │  index.ts         // 插件源文件目录
    │  typings.d.ts
    │
    ├─components        // ui组件
    │      HelloWorld.vue
    │
    └─plugin            // 插件源码目录
            index.ts    // 插件源码
插件内容
打包编译配置
插件
package.json,配置{ "name": "@esign-gov-base/hello-world-plugin", "version": "1.0.0", "description": "", "main": "index.js", "scripts": { "test": "echo \"Error: no test specified\" && exit 1", "build": "cross-env VUE_CLI_SERVICE_CONFIG_PATH=../../vue.config.base.js vue-cli-service build" }, "author": "", "license": "ISC" }name:插件名称
- 插件下package.json文件中name值 必须确保唯一性,在插件name值(或插件目录名)的基础上加上@插件所属域标识/前缀(当插件可以通过插件平台去管理时,前缀的作用就能体现出来,可以防止插件包名冲突)
{
  "name": "@esign-gov-base/hello-world-plugin"
}
- 插件下package.json文件中name值 必须确保唯一性,在插件name值(或插件目录名)的基础上加上@插件所属域标识/前缀(当插件可以通过插件平台去管理时,前缀的作用就能体现出来,可以防止插件包名冲突)
version:插件版本
main:插件入口
build: 打包配置
插件 ts 配置 tsconfig.json
{
  "extends": "../../../tsconfig.json",
  "include": [
    "src",
    "../../../src/shims-tsx.d.ts",
    "../../../src/shims-vue.d.ts",
  ],
  "compilerOptions": {
    "declaration": false
  }
}
# 插件开发
src 目录下 index 文件为必须文件,且必须以
index.js/index.ts,用于导出插件,可以配置多个导出plugin/index为插件详细导出配置插件文件中name值 必须确保唯一性,一般按照目录命名短横线拼接页面(功能模块)-...(扩展点拆分粒度自定义)-plugin
// 插件UI类组件
import HelloWorld from "../components/HelloWorld.vue";
import { Plugin, PluginAPI } from "@esign/plugin-core";

export default (): Plugin => ({
  name: "base-hello-world-plugin", // 插件的名称,唯一标识符
  // 插件初始化函数,只会执行一次;返回一个 Hook 对象
  setup({ setAppContext, useAppContext }: PluginAPI) {
    return {
      // core/manager.ts line 21
      "hello-world-epu": () => {
        // 返回 HelloWorld 组件
        return HelloWorld;
      },
    };
  },
});
TS类型声明介绍
- Plugin:
@esign/plugin-core导出的插件类型声明 - pluginAPI:
@esign/plugin-core导出 插件 API 类型声明
- Plugin:
扩展点定义
setup({ setAppContext, useAppContext }: PluginAPI) { return { // core/manager.ts line 21 "hello-world-epu": () => { // 返回 HelloWorld 组件 return HelloWorld; }, }; },- hooks名称 一般按照业务功能模块进行语义化命名,当前应用中必须保持唯一性标识,后缀必须以-epu、-epl或-ep结尾,其中epu为UI类扩展点(ExtensionPoint for UI),epl为逻辑类扩展点(ExtensionPoint for Logics),-ep为不限制类型扩展点(ExtensionPoint),如:hello-world-epu
- 插件中的单个 hook 方法时须与扩展点名称保持一致,如果需要自定义多个 hook 方法时命名自定义(需保证唯一性)
# 插件使用
所有插件均在根目录 plugins 目录下,走配置文件 config.json,此项配置需严格遵守,不然影响打包编译
- config.json文件存放在
plugins下
- config.json文件存放在
-
{ "name": "客户", "plugins": { "hello-world-epu": "/plugins/base/hello-world-plugin/src/index", "key": "path" } }- name 为所属项目域名称(例如 base、hangzhou、jiangxi 等,对应到 plugins 目录下的一级目录)。当主应用中需要打包杭州的定制插件时,需要设置 name 值为 hangzhou
- plugin 为主应用中的扩展点及其使用的插件的对应关系,key 为扩展点名称,value 为扩展点加载的插件的路径(编译后的插件会根据其 package.json 的版本号自动生产带有版本号标识的文件名)。当主应用中扩展点被挂载时,会通过配置的插件路径加载对应的插件并挂载
插件使用方式由两种,推荐组件的使用方式
方式一:组件 EsExtensionPoint 的方式实现
若以组件方式实现功能,需保证
plugins/config.json的key值,EsExtensionPoint组件的name参数 和 插件的hook必须保持一致# 调用插件 demo test.vue
<template>
  <div>
    <h1>{{transformTxt}}</h1>
    <!-- 扩展点插件 -->
    <EsExtensionPoint name="hello-world-epu" />
  </div>
</template>

<script lang="ts">
  import { Component, Vue } from "vue-property-decorator";

  @Component({})
  export default class TestView extends Vue {
    async mounted() {}
  }
</script>
方式二:自定义形式调用
# 插件代码
同组件使用方式部分插件代码# 调用插件 demo test.vue
<template>
  <div>
    <h1>{{transformTxt}}</h1>
    <component :is="homePageComponentName" />
  </div>
</template>

<script lang="ts">
import { Component, Vue } from 'vue-property-decorator'
// pluginManager 文件夹,与src、plugins同级,作用为维护插件与扩展点的对应关系
import { homePageEpuEsExtensionPoint } from '../../pluginManager'

@Component({})
export default class TestView extends Vue {
  homePageComponentName = ''
  transformTxt = ''
  async mounted() {
    // 此为插件引入方法,项目一经发布,不可删除
    this.homePageComponentName = await homePageEpuEsExtensionPoint();
  }
}
</script>
# pluginManager/index.js
- 用户自定义实现在根目录下创建pluginManager,如果使用方式一的组件形式,可不用创建pluginManager
import pluginManager, { createExtensionPointHook, } from "@esign/plugin-core"; export async function homePageEpuEsExtensionPoint() { const name = 'hello-world-epu' const path = getPluginPath(name); // 插件所提供的hooks,只可新增,不可修改及删除 const hooks = await pluginManager({ path, hooks: { [name]: createExtensionPointHook() }, }); const [Component] = await hooks[name](null); Vue.component(Component.name, Component); // 返回内容格式可自定义 return Component.name; }使用数据 SDK
# 插件嵌套
插件嵌套的插件都在plugin场景目录下面,目录结构
平铺展示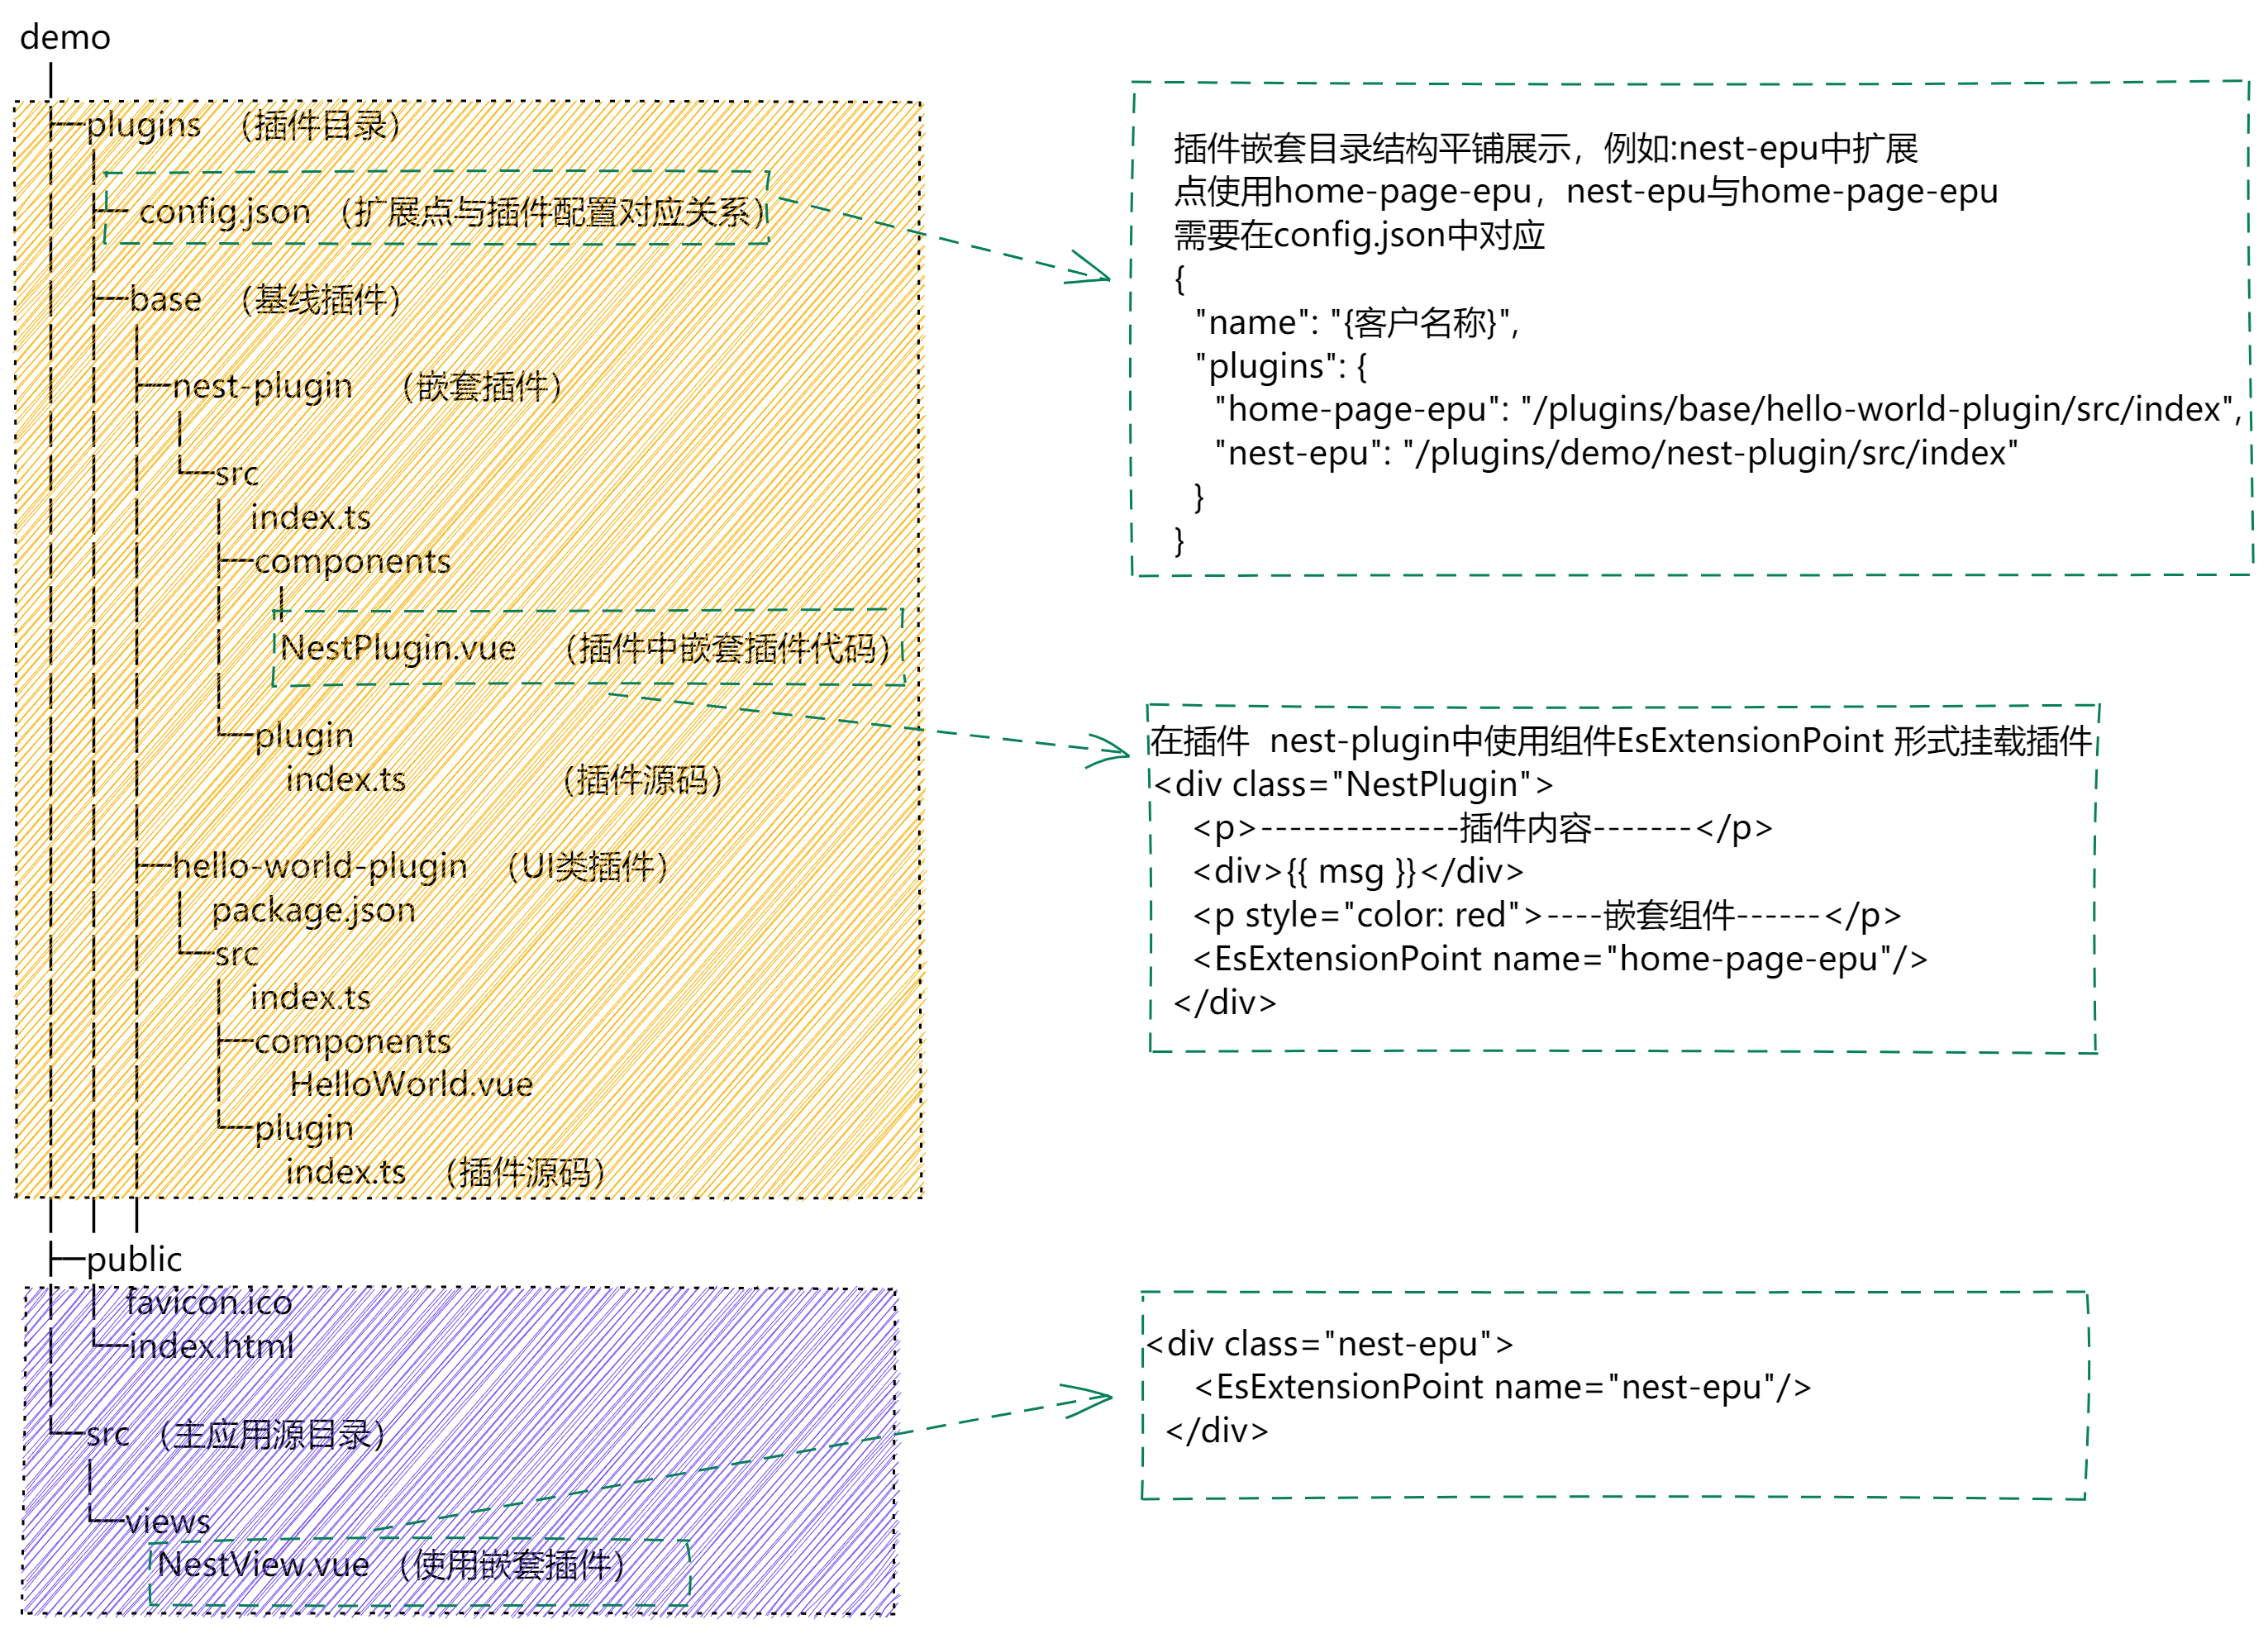
主应用调用嵌套插件
  <template>
    <div class="ui">
      <EsExtensionPoint name="nest-epu" msg="我是一个嵌套插件"/>
    </div>
  </template>
嵌套插件内组件部分代码
<template>
  <div class="NestPlugin">
    <p>--------------插件内容---------------------</p>
    <div>{{ msg }}</div>
    <p style="color: red">--------------嵌套组件---------------------</p>
    <EsExtensionPoint name="hello-world-epu" msg="我是一个嵌套插件"></EsExtensionPoint>
  </div>
</template>

<script lang="ts">
  import { Component, Prop, Vue } from "vue-property-decorator";
  export default class NestPlugin extends Vue {
    @Prop({ default: "NestPlugin" }) msg!: string;
    async mounted() {
    }
  }
</script>
插件代码
import { createAsyncWaterfall } from "@modern-js/plugin";
import HelloWorld from "./components/HelloWorld.tsx";
import type { Plugin, PluginAPI } from "@esign/plugin-core";

export default (): Plugin => ({
  name: "demo-plugin",
  registerHook: {
    customComponent: createAsyncWaterfall(), // 自定义组件 hooks
  },
  setup({ setAppContext, useAppContext }: PluginAPI) {
    return {
      // 方式二,通过自定义hook返回组件
      "hello-world-epu": () => {
        // 返回 HelloWorld 组件
        return HelloWorld;
      },
    };
  },
});
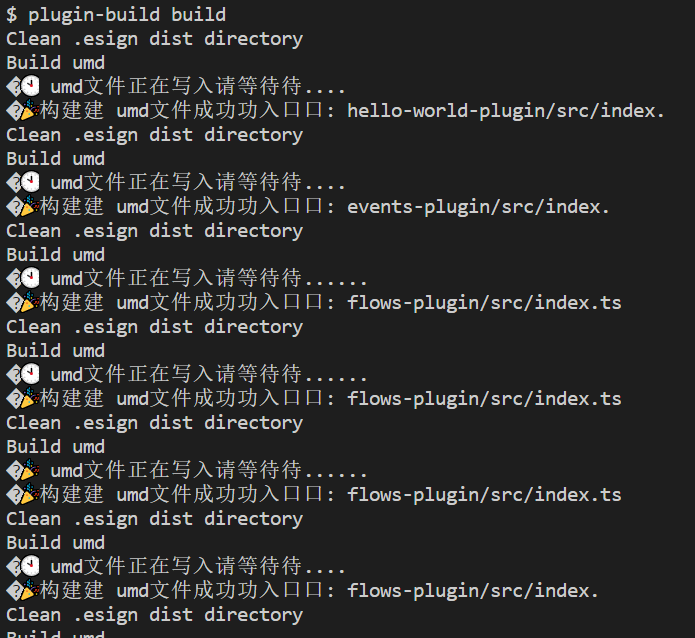
# 打包
根据上述命令执行
打包 plugins 目录下面的插件,打包到 dist/plugins 目录下面 vue.config.js配置打包输出路径(非超级APP)
module.exports = defineConfig({
  outputDir: 'dist/base',
  publicPath: '/',
  transpileDependencies: true,
})
打包指定插件(待实现)
build:plugin-module xxxx只打包插件
build:plugin只打包业务代码
build:base打包示例